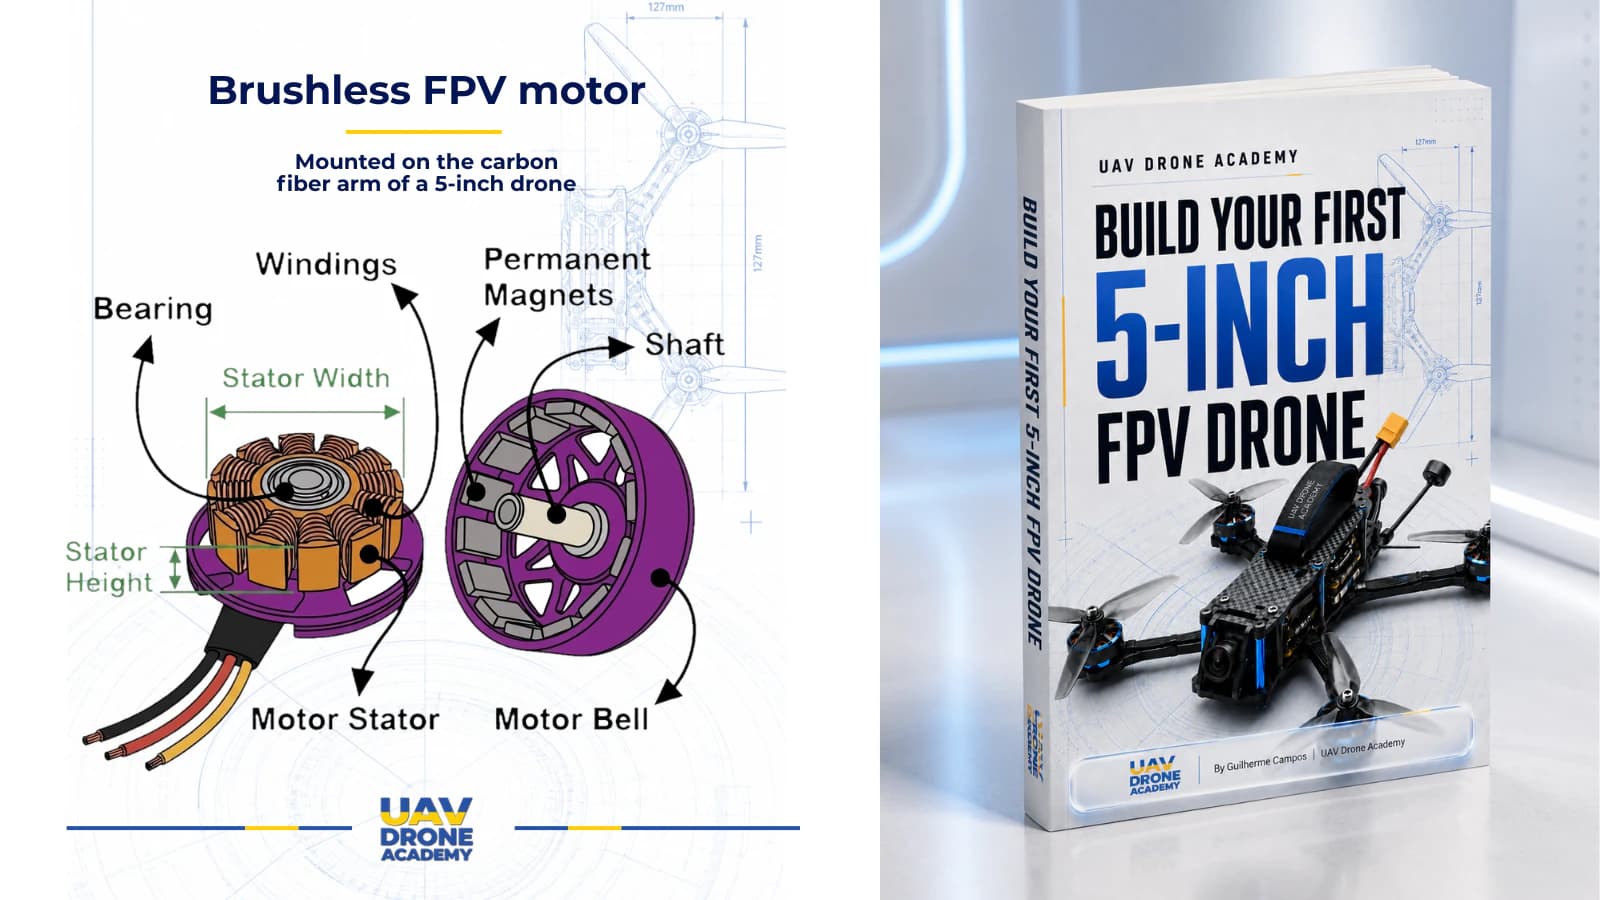
A brushless FPV motor looks simple from the outside. It is a small metal cylinder with three wires coming out of it, four screws holding it to a carbon fiber arm, and a propeller sitting on top. Very dramatic. Very tiny. Very easy to underestimate.
But inside that little motor, a lot is happening. Copper windings are creating magnetic fields. Permanent magnets are being pulled around in a controlled sequence. Bearings are keeping the rotating parts aligned. The shaft is carrying all the propeller load. The bell is spinning thousands of times per minute while your drone is vibrating, crashing, punching out, and occasionally meeting the ground in a deeply personal way.
This article is not about choosing motor size or KV rating. That topic belongs in FPV motors explained. Here, the goal is different: to understand what is actually inside a brushless FPV motor, what each part does, and what you should check when something starts sounding, feeling, or smelling wrong.
Why Motor Anatomy Matters
You do not need to become a motor designer to build a 5-inch FPV drone. That would be a little much. You do, however, need to understand enough to avoid damaging your motors during assembly and to recognize early warning signs after crashes.
Motor problems often start small. A gritty bearing. A bent shaft. A bell that rubs slightly. A mounting screw that is just a little too long. At first, the drone may still fly. Then the motor gets hot. Then the ESC works harder. Then your smooth freestyle session turns into a smoke-based learning experience.
Understanding motor anatomy helps you answer practical questions:
- Is this noise normal?
- Did I damage the windings?
- Is the bell bent?
- Are my mounting screws too long?
- Should I replace the motor or keep flying?
- Is the problem mechanical or electrical?
That is the kind of knowledge that saves money, time, and a few very unpleasant field repairs.
The Main Parts of a Brushless FPV Motor
A brushless FPV motor has several important parts working together. Some are stationary. Some rotate. Some are visible from the outside, while others only become obvious when the motor is opened or damaged.
The core parts are:
| Part | What it does | Beginner note |
|---|---|---|
| Stator | Creates the magnetic field through copper windings | Fixed in place; does not spin |
| Windings | Copper wire coils that carry current | Easy to damage with long screws |
| Motor bell | Outer rotating shell of the motor | Holds the magnets and spins with the propeller |
| Permanent magnets | React to the stator’s magnetic field | Usually attached inside the bell |
| Shaft | Transfers rotation to the propeller | Can bend after crashes |
| Bearings | Support smooth rotation | Can become gritty, noisy, or loose |
| Motor base | Mounts the motor to the drone arm | Where screws pass through the frame |
| Motor wires | Carry power from the ESC to the motor | Can break, scrape, or short if routed poorly |
The important idea is simple: the stator stays still, the bell spins, and the ESC controls the timing of the magnetic field. Everything else exists to keep that process smooth, strong, and repeatable.
The Stator: The Fixed Core of the Motor
The stator is the stationary core inside the motor. It is usually made from thin stacked steel laminations wrapped with copper wire. Those copper wires are the windings, and when current flows through them, they create magnetic fields.
The stator does not spin. It sits fixed to the motor base, bolted to the drone arm. The spinning part is the bell around it.
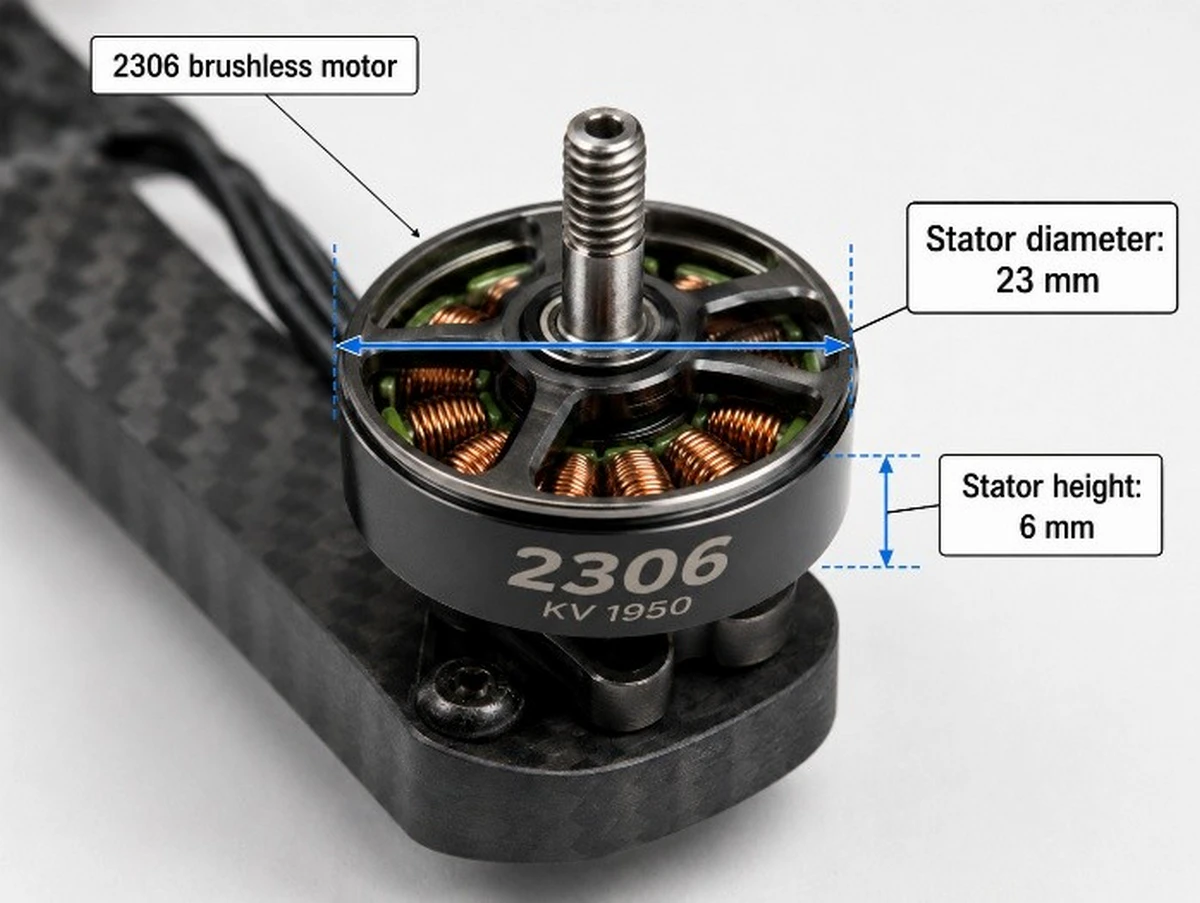
The stator is the fixed core of the motor. The copper windings create magnetic fields that make the bell rotate.
A useful way to think about the stator is this: it is the muscle of the motor. The ESC sends electrical pulses through the windings, and the stator turns that electrical energy into magnetic force.
This is also why the stator area is one of the places you should protect during assembly. If a mounting screw reaches into the windings, it can scrape the copper insulation or cut a wire. That can destroy the motor before it ever flies. Not exactly the glorious maiden flight you had in mind.
Windings: The Copper That Does the Work
The windings are the copper coils wrapped around the stator teeth. They are responsible for creating the magnetic fields that drive the motor.
From a beginner’s perspective, the most important thing about windings is not how they are designed. It is how easy they are to damage.
Three common ways beginners damage motor windings are:
| Mistake | What happens | How to avoid it |
|---|---|---|
| Mounting screws too long | Screw touches or cuts the windings | Check screw length before tightening |
| Debris inside the motor | Metal particles can scrape or short the windings | Clean motors after crashes in dirt or metal dust |
| Crash deformation | Bell or shaft damage can cause rubbing | Spin the motor by hand after hard impacts |
Windings usually have a protective coating, but that does not make them invincible. If copper is exposed, scraped, darkened, or smells burnt, take it seriously. A damaged winding can create heat, poor performance, desyncs, or complete motor failure.
The annoying part is that the motor may still spin on the bench. That does not mean it is healthy. FPV components have a charming habit of pretending everything is fine right before they ruin your day.
The Motor Bell: The Part That Spins
The motor bell is the outer rotating shell. When you look at an FPV motor from the outside, most of what you see is the bell. It holds the permanent magnets inside and is connected to the shaft, which spins the propeller.
The bell needs to spin smoothly and evenly. If it is bent, dented, or rubbing against the stator, the motor may still rotate, but it will not behave correctly under load.
Signs of bell damage include:
- scraping noise when spinning by hand
- uneven gap between bell and stator
- visible wobble
- vibration during throttle
- motor heating faster than the others
- propeller appearing to wobble even when the prop is not bent
A slightly bent bell can be hard to see. One simple check is to remove the propeller and spin the motor by hand while looking at the edge of the bell from the side. If it wobbles, something is off.
A motor bell is not just a cover. It is part of the rotating magnetic system. Treat it like a precision part, even though it lives on the end of a carbon arm and gets thrown into the ground for sport.
Permanent Magnets: The Hidden Pull
Inside the bell are permanent magnets. These magnets are arranged around the inner wall of the bell. When the ESC energizes the stator windings in sequence, the magnetic field pulls and pushes against these magnets, causing the bell to rotate.
You usually do not see the magnets unless the motor is disassembled or damaged. But they matter a lot.
If a magnet becomes loose, cracked, or shifted, the motor can vibrate, lose efficiency, or fail completely. A loose magnet can also scrape the stator, which is exactly as bad as it sounds.
Common magnet-related problems include:
| Problem | Possible symptom | What to check |
|---|---|---|
| Loose magnet | Clicking, scraping, vibration | Inspect inside the bell if possible |
| Cracked magnet | Rough rotation, imbalance | Look for fragments or uneven sound |
| Debris stuck to magnet | Grinding noise | Clean the bell carefully |
| Magnet rubbing stator | Heat and scraping | Check bell alignment and shaft |
Because magnets attract metal particles, motors can collect tiny bits of debris after crashes. If you fly around dirt, gravel, metal dust, or workshop debris, inspect your motors often. A motor full of magnetic trash is not a motor. It is a tiny blender with electrical problems.
Shaft and Bearings: Smooth Rotation Matters
The shaft is the central rotating part that connects the bell to the propeller. The bearings support the shaft and allow it to spin smoothly.
For the pilot, bearings are usually the first part of the motor that starts complaining out loud. A healthy motor should feel smooth when you spin it by hand. You may feel the magnetic cogging from the motor poles, but it should not feel gritty, crunchy, loose, or sticky.
A damaged bearing can create:
- rough motor sound
- extra vibration
- heat
- poor gyro data
- unstable flight feel
- shorter motor life
A bent shaft can cause similar symptoms, especially vibration and visible wobble. After a hard crash, remove the propeller and spin the motor by hand. Then compare it with the other three motors. FPV diagnostics often starts with the deeply scientific method of “does this one feel worse than the others?”
It works more often than it should.
Motor Base and Mounting Screws
The motor base is the lower part of the motor that attaches to the carbon fiber arm. This is where the mounting screws go through the frame and into the motor.
This area is boring until it ruins a motor.
The biggest beginner mistake is using screws that are too long. If the screw passes too far into the motor, it can touch the windings. Sometimes the damage is immediate. Sometimes the motor still works until vibration, heat, or current exposes the problem later.
Before installing motors, always check:
| Check | Why it matters |
|---|---|
| Screw length | Prevents screws from touching windings |
| Screw tightness | Prevents motor movement and vibration |
| Thread engagement | Ensures the motor is secure |
| Arm thickness | Changes how much screw length is safe |
| Wire direction | Helps avoid awkward wire routing |
If your frame arms are thinner than expected, screws that worked on another build may be too long. Never assume. Test fit carefully before tightening everything like you are assembling a bridge.
Motor Wires: Simple, Until They Are Not
A brushless FPV motor has three wires. These wires connect to the ESC. The ESC sends three-phase power through them, and the motor spins.
The good news: for most modern builds, motor wire order is not a big deal during soldering because motor direction can be changed in software or ESC configuration. The bad news: the physical routing still matters.
Motor wires should not be:
- rubbing against propellers
- pulled tight across sharp carbon edges
- pinched under the motor base
- crossing moving parts
- left unsupported where vibration can fatigue them
A damaged motor wire can cause intermittent problems that are extremely annoying to diagnose. The drone may arm normally, hover normally, and then twitch or fail under throttle. Very polite. Very evil.
When routing motor wires, keep them clean, short enough to avoid prop strikes, but not so tight that the arm flex pulls on the solder joint.
What to Inspect After a Crash
After a crash, beginners often check the propellers and battery first. That is fine. But motors deserve a quick inspection too, especially if the crash hit an arm or the drone landed upside down with props spinning.
Here is a simple post-crash motor check:
| Inspection | Healthy sign | Warning sign |
|---|---|---|
| Spin by hand | Smooth, similar to other motors | Gritty, tight, scraping, or uneven |
| Bell gap | Even around the stator | Bell looks tilted or rubs |
| Shaft | No visible wobble | Prop shaft appears bent |
| Windings | Clean copper, no damage | Scraped, darkened, cut, or burnt smell |
| Screws | Secure, correct length | Loose screws or signs of contact |
| Wires | Insulation intact | Cuts, flattened spots, exposed copper |
You do not need to disassemble the motor after every crash. But you should develop the habit of comparing all four motors by feel and sound. If one motor feels different, it probably deserves attention.
FPV drones are small, but they are not magic. When one corner of the drone sounds angry, something on that corner is usually angry.
When a Motor Should Be Replaced
Not every scratch means a motor is dead. FPV motors live a rough life, and cosmetic damage is normal. A scraped bell or dirty base does not automatically mean replacement.
But some signs are serious.
Replace or stop using the motor if you find:
- exposed or cut windings
- burnt smell
- bell rubbing the stator
- loose or broken magnet
- bent shaft causing visible wobble
- bearing so rough it affects rotation
- motor that gets much hotter than the others
- recurring desyncs or twitching from the same corner
A damaged motor can take other parts with it. If the motor shorts or overloads, the ESC may be the next victim. That is why “it still spins” is not always enough. The question is whether it spins smoothly, safely, and consistently under load.
Common Questions About Brushless FPV Motors
What is inside a brushless FPV motor? A brushless FPV motor contains a fixed stator with copper windings, a rotating bell with permanent magnets, a shaft, bearings, a motor base, and three motor wires connected to the ESC.
Does the stator spin in an FPV motor? No. The stator stays fixed to the motor base. The bell spins around the stator, and the shaft transfers that rotation to the propeller.
Why does an FPV motor have three wires? A brushless motor uses three-phase power from the ESC. The ESC energizes the windings in sequence, creating a rotating magnetic field that makes the motor spin.
How do I know if an FPV motor bearing is bad? A bad bearing may feel gritty, rough, loose, or noisy when you spin the motor by hand. Compare it with the other motors on the drone.
Can long screws damage an FPV motor? Yes. If mounting screws are too long, they can touch or cut the windings inside the motor. This can destroy the motor or create electrical problems.
Recap.
- The stator is the fixed core of the motor, wrapped with copper windings.
- The bell is the rotating outer shell that holds the permanent magnets.
- The shaft and bearings keep rotation smooth and aligned.
- Long mounting screws can damage windings before the drone ever flies.
- Motor wires must be routed cleanly to avoid cuts, prop strikes, and vibration damage.
- After crashes, always check for rough bearings, bent shafts, bell rubbing, damaged windings, and loose wires.
What's Next
Now that you understand what is inside a brushless FPV motor, the next step is learning how to install it without creating problems before the first flight. Continue with how to install motors on a 5-inch FPV drone, where we cover screw length, wire routing, motor numbering, and the small assembly mistakes that quietly destroy good components.